How to run a registration campaign to set up Microsoft Authenticator using the Microsoft Authenticator App

Registration campaign has been around for some time, but I never used it until now. I wanted to enable MFA in my own tenant so decided to leverage registration campaign as part of the overall configuration. Through this blog, I will share steps on how I went about configuring everything with a prime focus on registration campaign.
Microsoft has categorized the authentication methods based on usability and security against each method. While Passwordless is considered the Best secured method, SMS and Voice are only considered Good. Authenticator (Push notifications) sits in the middle which is easy to implement for organizations without too much hassle and should be done regardless to improve the security of user sign-ins.
Source: Microsoft
There are some pre-requisites involved for enabling registration campaign -
- Your organization must have enabled Azure MFA.
- User must not have already set up Microsoft Authenticator for push notifications on their account.
- Admins need to enable users for Microsoft Authenticator using one of these policies:
- User must not have already set up Microsoft Authenticator for push notifications on their account.
- Admins need to enable users for Microsoft Authenticator using one of these policies:
1. MFA Registration Policy: Users will need to be enabled for Notification through mobile app.
2. Authentication Methods Policy: Users will need to be enabled for the Microsoft Authenticator and the Authentication mode set to Any or Push. If the policy is set to Passwordless, the user will not be eligible for the nudge.
2. Authentication Methods Policy: Users will need to be enabled for the Microsoft Authenticator and the Authentication mode set to Any or Push. If the policy is set to Passwordless, the user will not be eligible for the nudge.
Let's look at the first requirement of enabling MFA (Ignore this step if already done.)
MFA comes with every edition of Azure AD with no additional licenses required and there are multiple ways to enable it.
You can either use security defaults in Azure AD to enable MFA or use Conditional Access policies. I will recommend using CA policies if your organization has complex security requirements and you need to enforce controls at a more granular level.
I have used a CA policy to enforce MFA and here are the steps -
1. Sign in to the Azure portal as a global administrator, security administrator, or Conditional Access administrator.
2. Browse to Azure Active Directory > Security > Conditional Access.
3. Select New policy.
4. Give your policy a name.
5. Under Assignments, select Users and groups
6. Under Include, select All users or specific list of users.
5. Under Exclude, select Users and groups and choose your organization's emergency access or break-glass accounts.
6. Select Done.
7. Under Cloud apps or actions > Include, select All cloud apps or specific apps.

8. Under Exclude, select any applications that don't require multi-factor authentication.
9. Under Access controls > Grant, select Grant access, Require multi-factor authentication.

10. Confirm your settings and set Enable policy to On. Note: It is a good practice to set to Report-only first to assess the impact of the CA policy.
11. Commit to create the policy.
Next up is to enable users for Microsoft Authenticator
The easiest way to enable this efficiently is through Authentication method in Azure AD.
1. Sign in to the Azure portal.
2. Browse to Azure Active Directory > Security > Authentication Methods.
3. Click on Microsoft Authenticator and Enable it.
4. Specify the target users and make sure you select Any or Push against the authentication mode and click on done.
5. Then Save the settings.

The last step is to configure Registration campaign.
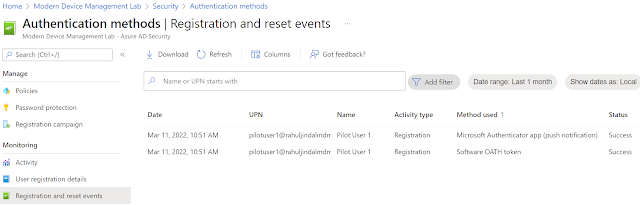
1. In the Azure AD portal, click Security > Authentication methods > Registration campaign.
2. For State, click Enabled, select number of days you want to allow the snooze for setting up Microsoft authenticator app.
3. Next select any users or groups to exclude from the registration campaign, and then click Save.
4. Under the Authentication methods, add the targeted lists of users for the Microsoft Authenticator app.

End User Experience
On accessing the cloud app targeted by the CA policy for enforcing MFA, user will be asked to setup for basic additional security sign-in methods like voice and SMS.


After the user has gone through setting up MFA, the user will immediately see a prompt for setting up Microsoft Authenticator app as well.

At this stage, the user can click on Not now to snooze or postpone the enrollment of Microsoft Authenticator app. The user will not be prompted until the window for snooze has elapsed. Once it does, then then user will have to configure the Microsoft Authenticator app.


Once done, you can then validate against the registration logs in Azure AD.

Conclusion
Nudge is a great feature in Azure AD that empowers admins to get users to set up for Microsoft authenticator using the Microsoft Authenticator app. However, please note that at the time of writing this blog, the feature is only available on browsers and not applications. Also, it will not work if the user is setup for password-less sign-in and that the feature is only supported for Microsoft Authenticator app. The good thing is that you can run the campaign for as long as you want. When you want to stop it, then just disable it in the Registration campaign settings.
Happy nudging..:-)


Comments
Post a Comment