Intune Windows custom compliance for tracking BitLocker Recovery Key & Protection status - An Administrator's experience!
When it comes to capturing BitLocker encryption status, there are multiple options available in the Windows compliance policy in Intune. From Require BitLocker, Require Secure Boot to be enabled on the device, and Require code integrity under Device Health attestation, to Require encryption of data storage on device which not only captures the encryption status of the OS drive against BitLocker, but even non-Microsoft encryption solutions. However, it is a known fact that due to delays in getting BitLocker encryption compliance to report in a timely and accurate manner, it can rather be challenging in getting the right compliance settings in place. Especially if the device compliance state is being used in Entra ID conditional access policies. Another issue that I have come across is lack of compliance reporting against BitLocker recovery key escrow. This is especially common in Co-management scenarios when the BitLocker Drive Encryption management has moved to Intune and the policies are applying on an already encrypted device. The expectation is that the BitLocker Recovery key would just copy back to Entra ID, but this doesn't happen every time. So how does one track this?
Solution lies in Custom Compliance!
Custom compliance feature for Windows OS platform in Intune has been around for some time. I have used it on multiple customer tenants to capture status on custom requirements like presence of CrowdStrike Falcon sensor for AV and\or Firewall and it works really well. So I asked myself, why not extend this to other configuration scenarios, like checking for BitLocker Recovery key, and here we are.
For custom compliance to work, one needs to setup a PowerShell detection script and a json file to draw a comparison between the declared values and what is returned back to Intune.
For Detection, this is what I put together -
$BitLockerRecoveryPass = $false
$BitLockerProtectionStatus = $false
$BitLockerProtectionStatus = (Get-BitLockerVolume -MountPoint "C:").ProtectionStatus
if((Get-BitLockerVolume -MountPoint "C:").keyprotector.recoverypassword -gt 0) {
$BitLockerRecoveryPass = $true
}
$output = @{ "Recovery Password escrow is complete" = $BitLockerRecoveryPass; "Protection Status" = $BitLockerProtectionStatus}
return $output | ConvertTo-Json -Compress
For the .json file, this is what I end up putting together -
{
"Rules": [
{
"SettingName": "Recovery Password escrow is complete",
"Operator": "IsEquals",
"DataType": "Boolean",
"Operand": true,
"MoreInfoUrl": "https://google.com",
"RemediationStrings": [
{
"Language": "en_US",
"Title": "BitLocker Recovery Key hasn't escrow as yet.",
"Description": "To continue using this device, please contact helpdesk."
}
]
},
{
"SettingName": "Protection Status",
"Operator": "IsEquals",
"DataType": "Int64",
"Operand": 1,
"MoreInfoUrl": "https://google.com",
"RemediationStrings": [
{
"Language": "en_US",
"Title": "BitLocker protection is not enabled.",
"Description": "To continue using this device, please contact helpdesk."
}
]
}
]
}
Note: Depending on the value being returned against the 'SettingName' field, it is important to select the correct 'DataType'. I encountered an issue briefly when I accidently left the wrong datatype for 'Protection Status' setting and it kept throwing an error in the Intune compliance indicating an issue with a mismatch in the data type.
Now all that is left is importing the scripts in Intune. Here are the steps -
1. Sign-in to the Microsoft Intune admin center
2. Browse to Devices –> Compliance -> Scripts
3. Click Add and select Windows 10 and later.
4. Provide a Name and populate rest of the fields as necessary, then hit next.
7. Copy the detection script from above in this blog post and paste it under Detection script and configured the rest of the settings as shown below. Note: Depending on the detection script you use, you may need to alter the execution context, especially if it involves on evaluating information in the user's profile.

8. Next step is to create a compliance policy. You can create a new one or edit an existing one. To create a new custom policy, navigate to Devices > Compliance > Create Policy.
9. Select Windows 10 and later under Platform and hit Create.
10. Give a Name and populate rest of the fields as necessary.
11. Under Custom Compliance, select your Discovery script created earlier together with the .json. On a successful import, it should look something like below which will automatically populate the details, involving the name of the settings, operators and the values.

12. Go ahead and select rest of the compliance settings as needed and assign as necessary.
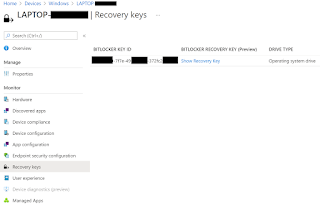
End Result
On a successful sync and evaluation of the compliance policy, the status will be reported back to Intune as intended.

This can also be validated in the C:\ProgramData\Microsoft\IntuneManagementExtension\Logs\AgentExecutor.log on the windows endpoint.

I wanted to write a quick how-to guide and publish it. Hope this helped. Until next time..
Reference:


Comments
Post a Comment