Microsoft Intune Connector health monitoring using Power Automate - The ins and outs.
If you work with Microsoft Intune to manage devices, be it corporate or personal, then most likely you would have dealt with monitoring the health of different Intune connectors. Admins can check their Intune tenant’s connector health using the Tenant Status page in the Microsoft Intune admin center. However, as of writing this article, there is no option available natively within Intune to proactively notify administrators on the health of the Intune connectors like Apple's Push Notification service (aka APNs). APN is a critical service which uses an Apple MDM Push certificate to manage iOS/iPadOS and macOS devices in Microsoft Intune. This certificate is required to be renewed annually and in failing to do so, you can end up re-enrolling all your Apple devices. In fact, Apple sends an automated email to the registered Apple ID configured for MDM Push Certificate, advising to renew the certificate before it expires. It looks something like this -
The reminder frequency is 30, 14 and 7 days. While organizations can use this default alerting process, it is in no way customizable. Also, what if the mailbox of the registered Apple ID is not monitored or you basically want to customize the monitoring and alerting for the APNs connector or Intune connectors in general? One of the easiest ways I found to achieve this is using Power Automate. I recently had to deal with the expiring of the APNs MDM Push Certificate in my own tenant so it was a perfect time to set this up.
What are the Pre-requisites?
1. Power Automate license.
2. Microsoft Entra ID
3. Microsoft Intune
4. A dedicated user account setup with M365 mailbox or a shared mailbox (Recommended if you are using the email notification action for alerting)
Let's start with registering an enterprise application in Entra.
1. Go to App registrations and create an application with the values shown below -
2. We need to add the relevant permissions to Microsoft Graph for DeviceManagementConfiguration.Read.All and DeviceManagementServiceConfig.Read.All.
3. Then grant the permissions on behalf of the organization.
4. Next step is to generate a new client secret key. Navigate to Certificates & secrets > Client secrets and create a new client secret key as shown below -
Note: Make a note of the value as it will be required later on.
5. Now we create the Power Automate cloud work flow. Go to Power Automate console > Create > Scheduled cloud flow.
6. I am creating a monthly monitoring check and notify for the APNs connector, but you can use any schedule cadence that you deem fit. This will come under Recurrence action. Just try not to configure the flow on an overly aggressive schedule otherwise you run the risk of default throttling against Graph API and Intune services.
Note: You can edit the properties of the flow later as well.
7. Create a new HTTP action to pull the details of the APNs Intune connector using the details shown below -
Method: GET
URI: https://graph.microsoft.com/beta/deviceManagement/applePushNotificationCertificate
Authentication: Active Directory OAuth
Authority: https://login.microsoft.com
Tenant: Directory (tenant) ID from Overview blade in your Azure AD App Registration
Audience: https://graph.microsoft.com
Client ID: Application (client) ID from Overview blade in your Azure AD App Registration
Credential type: Secret
Secret: Secret key value generated while configuring the Azure AD App Registration.
8. Run the GET request in the Graph explorer against the APNs URI and capture the JSON response. If you are running the GET request for the first time, then you may have to grant consent to the APIs.
9. Create the Parse JSON action and use the Generate from sample to construct the JSON schema.
Note: This is where you copy the JSON response captured from step 8.
10. Since I want to capture the number of days in the subject of the email notification, I am creating a couple of variables to capture and calculate the days. This is completely optional and there maybe other ways to achieve this, but I found this easy and decided to setup this way. Add an action Initialize a variable startdate and configure the following values -
Name: startdate
Type: String
Value: utcNow() (Note: This is a fx to capture the current date and time in UTC.)
11. Repeat step 10 and create another variable enddate with the following values.
Name: enddate
Type: String
Value: Body expirationDateTime (Note: This is to capture the expirationDateTime of the APNs connector. Use the Dynamic Body.)
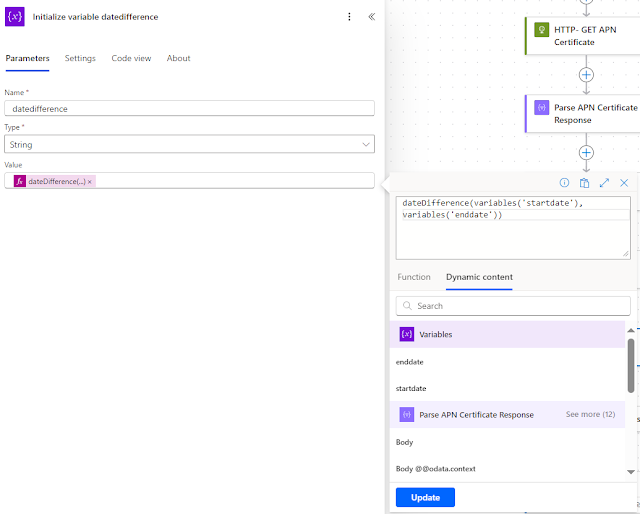
12. Repeat step 10 and create another variable datedifference with the following values.
Name: datedifference
Type: String
Value: dateDifference(variables('startdate'),variables('enddate')) (Note: This is a fx to calculate the date difference between start and end date.)
13. Repeat step 10 and create another variable days with the following values.
Name: days
Type: Integer
Value: int(split(variables('datedifference'),'.')[0]) (Note: This is a fx to capture just the value of days calculated through the date difference between start and end date.)
14. Last step is to create an action for sending an email. I faced issues getting V3 to work so used V2 instead.
15. Authenticate using the dedicated user account if you selected 'Send an email (V2)' action.
Note: This step is important as the email will be sent using this account.
16. Populate the fields like To, Subject, Body as needed. Following is what I added leveraging dynamic content -
17. Save and either wait for the flow to trigger as per the schedule or run it manually if you want to test it.
Final thoughts..
For example, you may want to run a daily check against other connectors like Managed Google Play Connection and Windows Autopilot together. This will involve having the same schedule cadence as part of the recurrence trigger and adding the GET and Parse JSON for both of these connectors in the same flow.
Until next time..


Comments
Post a Comment