Windows Autopilot - Fixing Windows 11 VM 'No Internet' issue hosted in a Windows Server OS Hyper-V
In my line of work, I have to work with all kind of devices spread across multiple OS platforms. Now when it comes to building and testing a configuration on Windows endpoints, I would normally use a physical device or in absence of it, I will turn to a virtual setup involving a Windows 10\11 VM or most recently a Cloud PC. For sometime now, I have been hosting the Windows 10\11 VM in a Hyper-V installed on a Windows 10 Azure VM enabled & configured for nested virtualization. While this got the job done, it couldn't really match the performance of what Hyper-V running on Windows Server OS could deliver. I recently setup a new test tenant and used it as an opportunity to cleanup and introduce some new configurations. I decided to setup a Windows Server 2022 OS VM and installed Hyper-V on it then created the guest Windows 11 VM inside it. While I followed the usual steps of putting the configuration together like I did before, I did encounter some issues and learnt some new things along the way. It didn't seem as straight forward as one would have hoped for so I decided to capture the details and my overall experience in this blog post.

Get-NetAdapter (Run this to identify the Interface Index for assigning of IP Address)


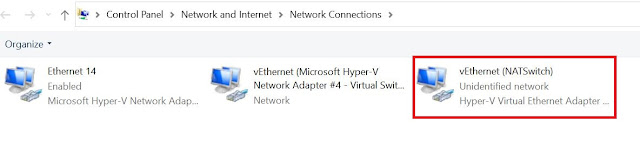
The NAT switch adapter should be visible in both Network adapters and Hyper-V switch manager. Make sure you assign the newly created NATSwitch to your Windows 11 VM.


The Issue..
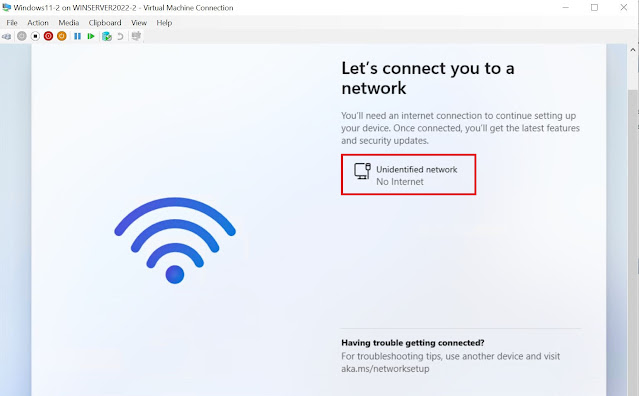
Let me dive straight into the issue. After creating the Azure Windows Server 2022 OS and installing Hyper-V followed by creating the Windows 11 23H2 VM, I immediately noticed the issue where Windows 11 VM didn't have any internet connectivity.

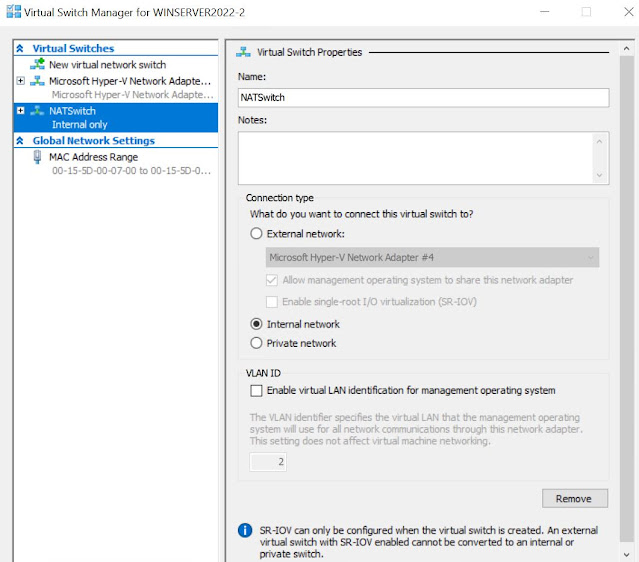
This is obviously not ideal especially if you are trying to provision the VM using Autopilot which relies solely on internet connectivity. So how did I reach to this point where the VM didn't have internet connectivity? A bit of research led me to the fact that unlike in Windows 10\11 Hyper-V where a Default Switch is created by default for the purpose of assigning IP addresses by allowing NAT through the internal switch and DHCP, the same is done through either an internal or external switch in Hyper-V session running on a Windows Server OS. In other words, the NAT configuration on a Windows Server OS running a Hyper-V needs to be created separately and this is done by the means of running some PowerShell commands.
Fix..
I ran the following commands to create NAT and configure a NAT switch for Hyper-V.
New-VMSwitch -SwitchName "NATSwitch" –SwitchType Internal


New-NetIPAddress –IPAddress 192.168.0.1 -PrefixLength 24 -InterfaceIndex 108 (I am using 192.168.x.x as an example here.)

New-NetNat –Name MyNATnetwork –InternalIPInterfaceAddressPrefix 192.168.0.0/24

The NAT switch adapter should be visible in both Network adapters and Hyper-V switch manager. Make sure you assign the newly created NATSwitch to your Windows 11 VM.


That's it. Now you should be able to assign a static IP to the VM from the same subnet that was configured for NAT switch.
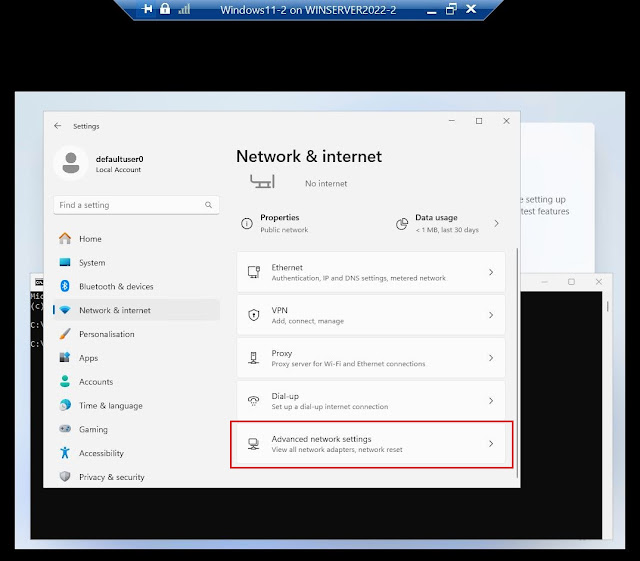
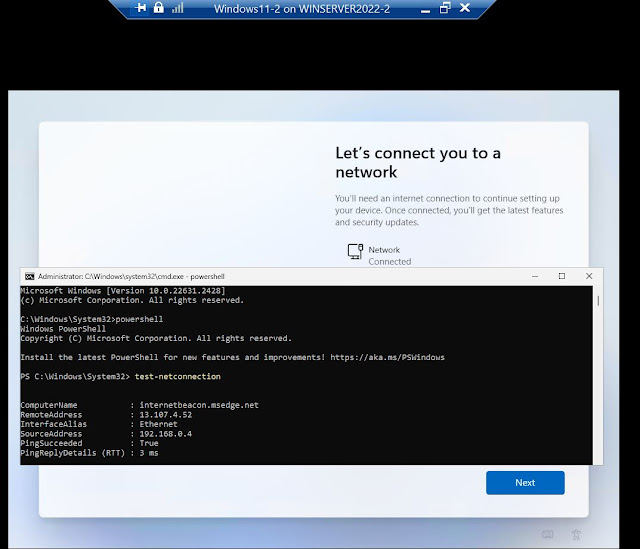
When in OOBE stage, press shift + f10 to bring the command prompt and type start ms-settings:

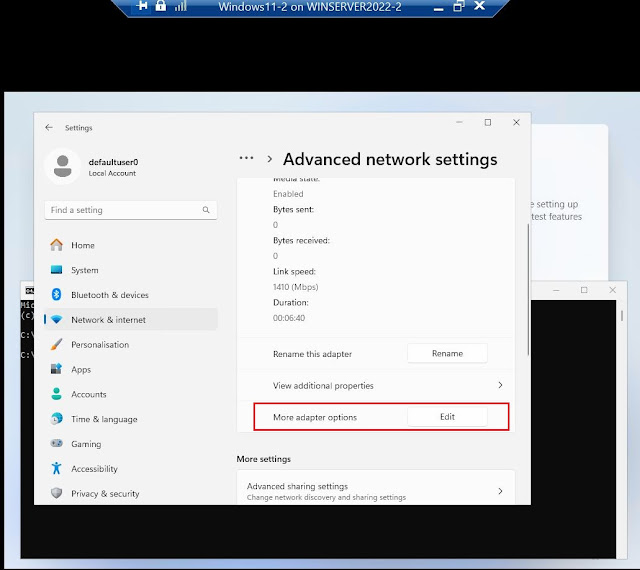
Navigate to Advanced network settings under Network & Internet.

Bring up the Internet Protocol Version 4 TCP/IPv4 settings under More adapter options.

Enter the IP from set NAT IP address range as shown below.

You should now have internet connectivity on the VM. You can run test-netconnection in PowerShell to check for internet connectivity.

Hope this post helps and saves you from a bit of trouble in setting up a similar configuration. Until next time..
References - New-NetNat (NetNat) | Microsoft Learn


Such an informative post Thanks for sharing. We are providing the best services click on below links to visit our website.
ReplyDeleteBest Microsoft Azure Administrator Training
MS Azure Admin Online Training
Microsoft Azure Online Training-India
Azure Admin Training in Hyderabad
Microsoft Azure Training in Ameerpet
Microsoft Azure Training in Hyderabad
Azure Admin Online Training
Azure Administrator Online Training
Microsoft Azure Administrator Training (AZ-104)
AZ-104 Microsoft Azure Administrator course
It was awesome to read, thanks for sharing
ReplyDeleteDevSecOps Online Training
Multi-Cloud DevSecOps Training
DevSecOps Training in Hyderabad
Multi-Cloud DevSecOps Online Training
Multi-Cloud DevSecOps Course Training
DevSecOps Training Course in Hyderabad
This article is a gem! I appreciate the detailed research you put into it. It’s refreshing to see such thoroughness!
ReplyDeleteGreat content! Thanks for sharing this valuable perspective!
ReplyDeleteISO Lead Auditor Training Course in Malaysia