Windows Autopilot for pre-provisioned and individual Co-management Workloads

A large number of my customers are implementing Autopilot device provisioning process in an effort to move away from traditional imaging solutions like ConfigMgr and adopt cloud first strategy, whilst retaining their investment in ConfigMgr. This normally results in a mixed workload management through Co-management which can be setup and configured easily. For devices being provisioned using Autopilot, there is actually more than 1 way to achieve a co-managed state for the endpoints. If you are looking for a native solution, then Microsoft recently introduced Co-management settings right in MEM Console which can be used to apply the settings automatically during ESP phase.

However, this method doesn't support all scenarios and there are some limitations, namely -
- Hybrid Azure AD-joined devices are not supported.
- Autopilot pre-provisioning, also known as white glove provisioning is not supported.
- Workloads switched to Pilot Intune with pilot collections are not supported.
- Clients that authenticate with PKI certificates are not supported.
So if your setup involves any of the above design elements, then you cannot use the native Co-management settings feature in Intune. But that doesn't mean you cannot achieve Co-management through Autopilot. The good old method of installing the ConfigMgr agent is still valid and you can continue to use it. However, Microsoft have recently introduced some changes that can cause issues if you haven't moved all your workloads to Intune and managing them individually.
The Issue
Working on a Windows 11 project, I recently encountered issues with the installation of security updates for Microsoft 365 Apps. In my scenario, the devices are AADJ, Co-managed with Office application setup and installing from Intune. This is how the workloads are setup in the environment.

As you can see that Office Click-to-Run apps workload is with ConfigMgr so updates should install from ConfigMgr, but this didn't work and it was clearly evident in the updatesdeployment.log


So what is going on?
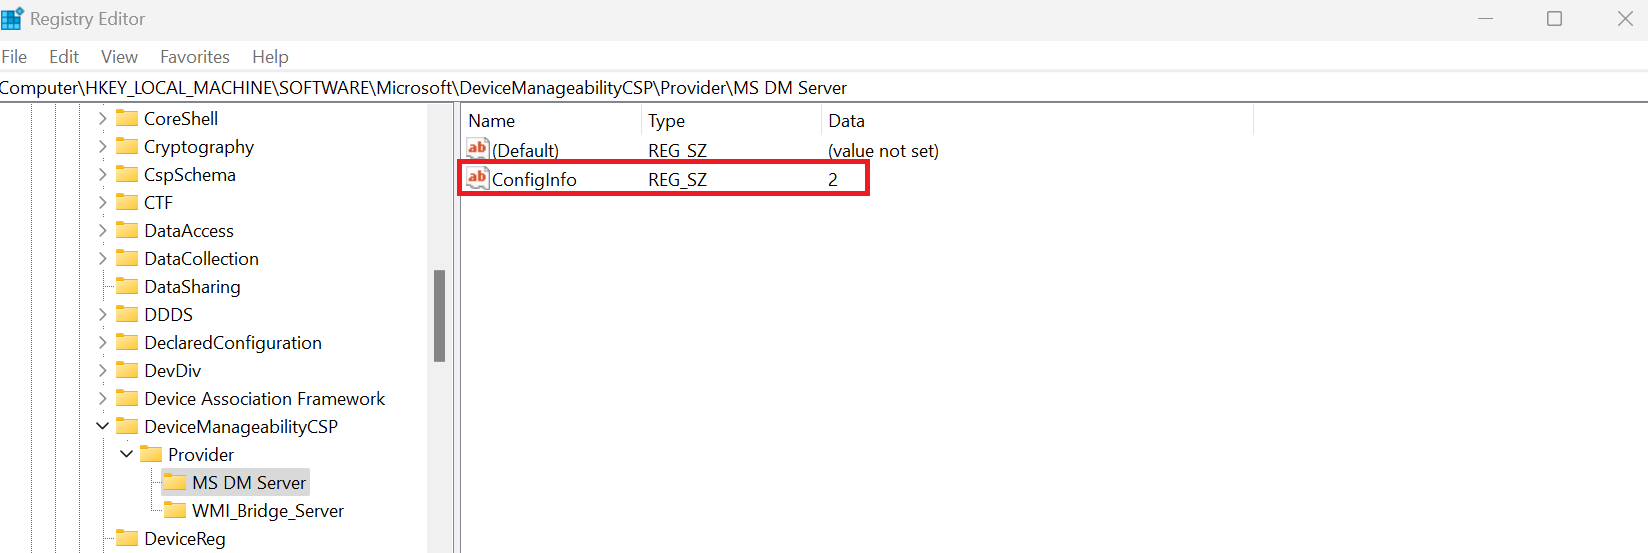
Endpoints enrolled in Intune follow a concept of management authority. This authority establishes Intune or ConfigMgr as the service owner for the management of the workloads on the device. The authority owner can be tracked by a simple registry key and value.
HKLM\SOFTWARE\Microsoft\DeviceManageabilityCSP\Provider\MS DM Server
When provisioning a device with Autopilot, the above key gets created right after you enter your username and password at the enrollment screen. This key tells the device which service has the device management authority for workload management.
Value '1' sets device management authority to Intune.
Value '2' sets device management authority to Configuration Manager.
Starting with Windows 10 20H2 and Windows 11, this key gets automatically created with a default value of 1, indicating that Intune is the Device management authority service. Microsoft recently released a blog post that covers this in detail.
Solution Part 1
If you are installing Microsoft 365 apps using Intune, then you have to make sure first that you have setup Microsoft 365 Apps in Intune correctly. There are 2 ways to achieve this -
1. Using the default Microsoft 365 Apps type with a custom XML.
2. Wrapping in .Intunewin extension and deploying as a Win32 app. (Recommended)
If you are just deploying cloud apps, then the first option can be used during Autopilot provisioning. However, if you have a mixture of cloud and standard apps, then it is highly recommended to deploy apps as Win32.
I won't go into details on creating Win32 app, however, I will like to share details on the xml file and things to consider if you are patching using ConfigMgr under Co-management. In a post from Feb'21, I had shared the process on how one can go about creating a custom xml for deploying Microsoft 365 Apps using Intune. This process can still be used for creating an xml for the purpose of setting up a Win32 app. The only addition needed will be the inclusion of the OfficeMgmtCOM attribute. But why is this needed?
For Configuration Manager to be able to manage Microsoft 365 Apps updates, an Office COM object needs to be enabled on the computer where Office is installed. If set to TRUE, the Office COM object takes commands from Configuration Manager to download and install client updates.
Since Microsoft 365 apps installed from Intune is C2R based and designed to pull down updates directly from CDN, to ensure updates are managed using ConfigMgr instead, the OfficeMgmtCOM attribute will need to be added explicitly. Here is an example of the xml.
<Configuration ID="e9f39dc5-9fb8-442d-80fd-d01c9926cbd6">
<Add OfficeClientEdition="64" Channel="SemiAnnual" OfficeMgmtCOM="TRUE" MigrateArch="TRUE">
<Product ID="O365ProPlusRetail">
<Language ID="en-us" />
<ExcludeApp ID="Groove" />
<ExcludeApp ID="Lync" />
</Product>
</Add>
<Remove All="TRUE"/>
<Property Name="SharedComputerLicensing" Value="0" />
<Property Name="FORCEAPPSHUTDOWN" Value="TRUE" />
<Property Name="DeviceBasedLicensing" Value="0" />
<Property Name="SCLCacheOverride" Value="0" />
<Updates Enabled="TRUE" />
<AppSettings>
<Setup Name="Company" Value="xxxxx" />
<User Key="software\microsoft\office\16.0\excel\options" Name="defaultformat" Value="51" Type="REG_DWORD" App="excel16" Id="L_SaveExcelfilesas" />
<User Key="software\microsoft\office\16.0\powerpoint\options" Name="defaultformat" Value="27" Type="REG_DWORD" App="ppt16" Id="L_SavePowerPointfilesas" />
<User Key="software\microsoft\office\16.0\word\options" Name="defaultformat" Value="" Type="REG_SZ" App="word16" Id="L_SaveWordfilesas" />
</AppSettings>
<Display Level="None" AcceptEULA="TRUE" />
</Configuration>
Wrap the xml together with setup.exe and import it normally in Intune. Again, I will not go into the details on how to import Microsoft 365 Apps as Win32 because this is a widely covered topic in the technical community and there are a number of great blog posts that cover this process at length.
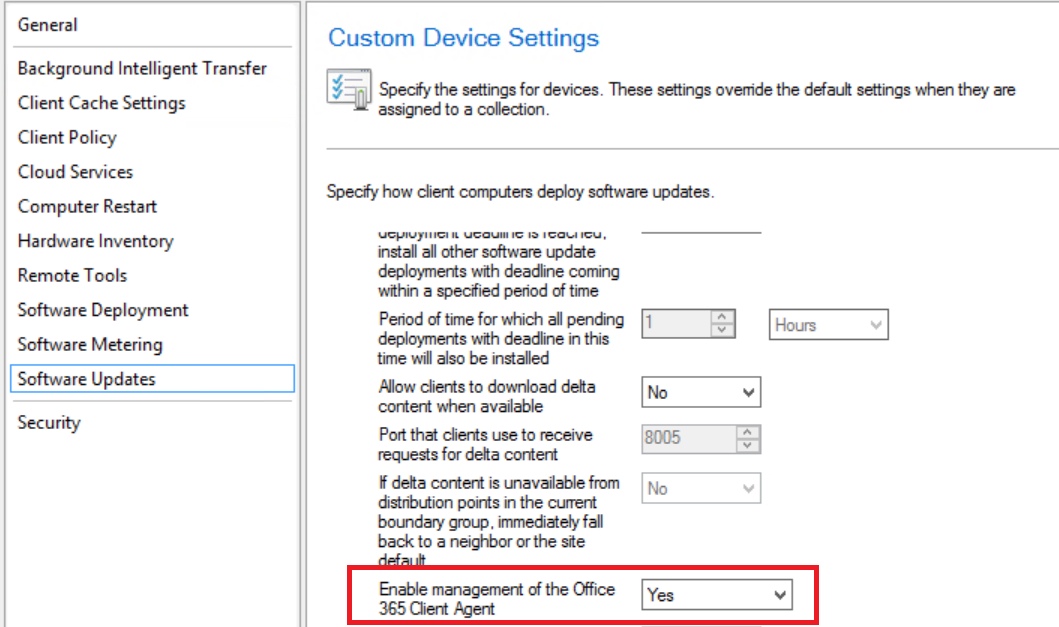
Next step is to ensure that you have enabled management of Office 365 updates in ConfigMgr client settings.
Solution Part 2
Now that we have setup Microsoft 365 Apps, we need to flip the value of the MS DM server to ConfigMgr.
Note: There are multiple ways to achieve this, but I'll advice to implement the solution using ConfigMgr as in my experience, solution from Intune can interfere with the Autopilot provisioning process.
I chose to setup a TS with the necessary steps to ensure speedy configuration. This is a 2 step process.
1. Set the correct registry value.
2. Invoke CIM method to trigger evaluation of compliance settings. Note: This is particularly important, otherwise the change in the registry value for device management authority will not come into effect (unless you have a very aggressive compliance setting evaluation schedule configured in client settings). There is an excellent article written by Niall Brady which covers different methods of triggering the evaluation of compliance settings which you can read over here. My setup is based of the details covered in his blog, so credit to him for sharing it.
Step 1 - MS DM Server ConfigInfo Value
REG ADD "HKEY_LOCAL_MACHINE\SOFTWARE\Microsoft\DeviceManageabilityCSP\Provider\MS DM Server" /v ConfigInfo /t REG_SZ /d 2 /f /reg:64

Step 2 - Invoke DCM CoMgmtSettingsPilotCApp (Note: The compliance setting will be different if you have moved the workload to Intune instead of Pilot.)
$instance = Get-WmiObject -Namespace root\ccm\dcm -Query "Select * from SMS_DesiredConfiguration WHERE DisplayName = 'CoMgmtSettingsPilotCApp'"
Invoke-CimMethod -Namespace root\ccm\dcm -ClassName SMS_DesiredConfiguration -MethodName TriggerEvaluation -Arguments @{"Name" = $instance.Name; "Version" = $instance.Version; "PolicyType" = $instance.PolicyType}

Step 3 - Invoke DCM CoMgmtSettingsPilotCP (Note: The compliance setting will be different if you have moved the workload to Intune instead of Pilot.)
$instance = Get-WmiObject -Namespace root\ccm\dcm -Query "Select * from SMS_DesiredConfiguration WHERE DisplayName = 'CoMgmtSettingsPilotCP'"
Invoke-CimMethod -Namespace root\ccm\dcm -ClassName SMS_DesiredConfiguration -MethodName TriggerEvaluation -Arguments @{"Name" = $instance.Name; "Version" = $instance.Version; "PolicyType" = $instance.PolicyType}

Step 4 - Invoke DCM CoMgmtSettingsPilotDC (Note: The compliance setting will be different if you have moved the workload to Intune instead of Pilot.)
$instance = Get-WmiObject -Namespace root\ccm\dcm -Query "Select * from SMS_DesiredConfiguration WHERE DisplayName = 'CoMgmtSettingsPilotDC'"
Invoke-CimMethod -Namespace root\ccm\dcm -ClassName SMS_DesiredConfiguration -MethodName TriggerEvaluation -Arguments @{"Name" = $instance.Name; "Version" = $instance.Version; "PolicyType" = $instance.PolicyType}

Step 5 - Invoke DCM CoMgmtSettingsPilotEP (Note: The compliance setting will be different if you have moved the workload to Intune instead of Pilot.)
$instance = Get-WmiObject -Namespace root\ccm\dcm -Query "Select * from SMS_DesiredConfiguration WHERE DisplayName = 'CoMgmtSettingsPilotEP'"
Invoke-CimMethod -Namespace root\ccm\dcm -ClassName SMS_DesiredConfiguration -MethodName TriggerEvaluation -Arguments @{"Name" = $instance.Name; "Version" = $instance.Version; "PolicyType" = $instance.PolicyType}

Step 6 - Invoke DCM CoMgmtSettingsPilotRAP (Note: The compliance setting will be different if you have moved the workload to Intune instead of Pilot.)
$instance = Get-WmiObject -Namespace root\ccm\dcm -Query "Select * from SMS_DesiredConfiguration WHERE DisplayName = 'CoMgmtSettingsPilotRAP'"
Invoke-CimMethod -Namespace root\ccm\dcm -ClassName SMS_DesiredConfiguration -MethodName TriggerEvaluation -Arguments @{"Name" = $instance.Name; "Version" = $instance.Version; "PolicyType" = $instance.PolicyType}


Since I wanted to ensure that the correct Co-management workloads are configured all the time, I am setting the schedule for the TS to run at every user Log on session. (Note: If your compliance setting evaluation schedule in client settings is configured to run more frequently than the default 7 days, then you can set the re-run schedule for the TS to something more less frequent.)

End result
After ConfigMgr agent finishes installing in the ESP phase, the advertised TS to the dynamic collection will run and the value of the DM server will change from 1 to 2.
The value of Co-management will get set to correct value as per the workloads configured.


You should see the OfficeMgmtCOM object enabling and UpdatesEnabled to True in the registry.

Updatesdeployment.log will also indicate that ConfigMgr is managing the updates for Office 365.

Additionally, COM object for Office C2R will get added.

The status in ConfigMgr can also be verified for update management for Office 365 by running the following CMPivot query.

Until next time..


ReplyDeleteSuch a Nice post. Thanks for Awesome tips Keep it up
windows-10-crack-free-download
ReplyDeleteSuch a Nice post. Thanks for Awesome tips Keep it up
windows-10-crack-free-download
Thanks for providing this information
ReplyDeletePower BI Online Training
Power BI Online Course
Thanks for sharing such quality information.
ReplyDeletePower BI Online Training in Hyderabad
Power BI Online Training in India