Using Custom Detections to trigger response actions on macOS in Microsoft Defender XDR

Microsoft Defender XDR (Rebranded and formerly known as Microsoft 365 Defender) has many features and as part of Advanced hunting under incident & response, Custom detections is a great way to create rules to monitor events and system states proactively, including suspected breach activity and misconfigured endpoints. One can then enable & configure response actions using various device & identity attributes and set them to run at regular intervals, generating alerts.
Custom detections uses Advanced hunting which is based on the Kusto Query Language (KQL) which is a powerful tool that uses schema entities organized in a hierarchy similar to SQL. The language is expressive, easy to read and understand.
To manage custom detections, you need to be assigned one of these roles permissions at a minimum:
- Security settings
- Security administrator
- Security operator
To understand Custom detections better, I wanted to explore the possibility of initiating a response action on endpoint devices, when an active alert was detected by Defender data source sensors. One common scenario that surfaces in my discussions with customers is how to initiate an automated antivirus full scan if there was an active alert as the first response action under triage process. In this blog, I will cover the steps and configuration I put in place in my own tenant for initiating an automated AV scan on macOS when an active alert was detected triggered through the EDR sensor.
Creating a Custom detection query
1. Navigated to Microsoft Defender portal > Advanced hunting > Click + > Query in Editor.

Note: To create a custom detection rule, the query must return the following columns:
Timestamp used to set the timestamp for generated alerts
ReportId - enables lookups for the original records
In addition to the above, at least one columns needs to be included in the query that can identify specific devices, users, or mailboxes.
2. Use the following query to pull the active alerts for macOS platform, as shown below -
AlertEvidence
| where ServiceSource == "Microsoft Defender for Endpoint"
| extend alertdata=parsejson(AdditionalFields)
| extend LastRemediationState = alertdata.LastRemediationState
| extend OSFamily = alertdata.OSFamily
| where OSFamily == "Mac"
| where LastRemediationState == "Active"
3. With the query in the query editor, select Create detection rule and specify the following alert details:
Detection name - A unique name for the detection.
Frequency - interval for running the query and taking action.
Every hour—runs hourly, checking data from the past 4 hours
Every 3 hours—runs every 3 hours, checking data from the past 12 hours
Every 12 hours—runs every 12 hours, checking data from the past 48 hours
Every 24 hours—runs every 24 hours, checking data from the past 30 days
Continuous (NRT)—runs continuously, checking data from events as they're collected and processed in near real-time (NRT), see Continuous (NRT) frequency
Alert title - A unique title when alerts are triggered
Severity - Potential risk of the component or activity identified by the rule
Category - Threat component or activity identified by the rule
MITRE ATT&CK techniques (Optional) - One or more attack techniques identified by the rule. This section is hidden for certain alert categories.
Description - This is a mandatory field so feel free to provide additional information related to the custom detection alert
Recommended actions (Optional) - Additional actions that responders might take in response to an alert


Impacted entities - Columns in the query results that return affected or impacted entity.

Actions on devices - These actions are applied to devices in the DeviceId column of the query.

3. Check the summary and turn on the rule which will then enable immediate execution of the rule. It will then run again based on configured frequency.
Testing Results
For testing purposes, you can run https://aka.ms/mdatpmacosdiy and extract the contents using Edge for macOS or Safari. Right click the extracted file MDATP MacOS DIY to run it. Depending on your security preferences, you may have to go under and run it from there.

After a while an active alert should generate. Custom detection rule will also due to NRT frequency and create a custom alert as well.
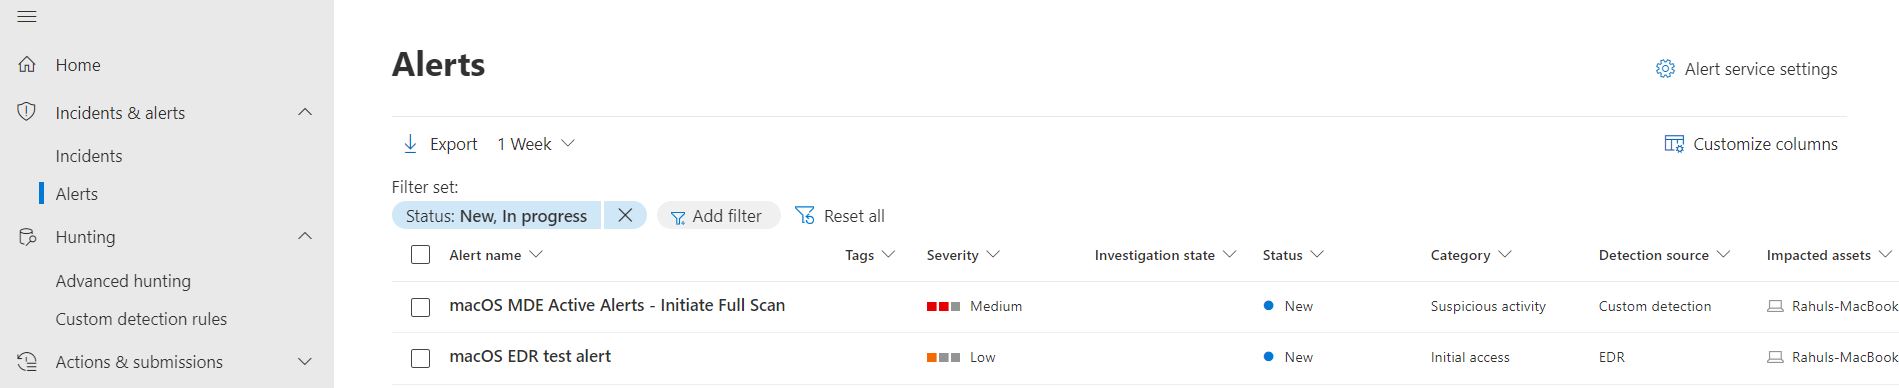
Custom detection rule will then trigger the configured action of running a full AV scan.


Full AV scan can be seen being triggered and completing on the device.


Action status will update for the device and report the same in the action center.


Final thoughts
The use cases are limitless as every organization may want to configure the custom detections matching their SOC process. What I like the most about this feature is that there are many built-in actions available spanning across devices, users, files and emails, thus enabling organizations for enhancing their custom alerting needs and capabilities.
One thing to note is that if you are Defender permissions are managed through RBAC (Role Based Access Control), then you may have look at configuring appropriate permissions for the devices in the device scope of a custom detection rule while creating or editing the rules.
References:


Great post! Custom detections in Microsoft Defender XDR are essential for proactive security. Thanks for the clear, actionable guidance!
ReplyDelete